Activity 2: Relative Reactivity of Halogens and Halides (student version)

Introduction
The halide anions and halogen elements are appreciably different in their tendencies toward oxidation and reduction.
Purpose
To determine the relative ease of oxidation of chloride, bromide, and iodide ions and the relative oxidizing strengths of their respective elements.
Safety
1. Wear protective goggles throughout the laboratory activity.

2. Do not inhale vapors from the halogens or cyclohexane.

3. All reagents should be placed in the fume hood and dispensed from there.

4. Do not interchange droppers used to dispense the solutions.

5. No operating burners or other flames should be present in the laboratory during this laboratory activity.

6. Any chemicals spilled on your skin or clothing should be immediately washed off with large amounts of water; report the incident to your teacher.

7. Do not cover the test tubes with your thumb to mix the reagents—use a cork instead. Corks should not be interchanged and should be left loose on the test tubes after mixing.

8. Read the labels carefully; e.g., chloride vs. chlorine.

9. Dispose of the materials as your teacher directs.

Procedure
1. Obtain nine small, clean test tubes. They need not be dry since aqueous solutions will be placed in them. With a wax crayon, label them from 1 to 9.  To one test-tube, add 1 mL water. Mark the level with a wax crayon. Add two successive milliliters water and mark the tube at the 2- and 3-mL levels.  Using this test-tube as a guide, mark the other eight test tubes in a similar fashion.

2. Take Tubes 1-6 to the hood.

In Tube 1 place 1 mL chlorine water, Cl2 (aq);
in Tube 2 place 1 mL bromine water, Br2 (aq);
in Tube 3 place 1 mL iodine water, I2 (aq);
in Tube 4 place 1 mL potassium chloride (KCl) solution;
in Tube 5 place 1 mL potassium bromide (KBr) solution;
in Tube 6 place 1 mL potassium iodide (KI) solution.


(Remember, KCl in aqueous solution consists of K + ions and Cl ions. KBr and KI are also dissociated in aqueous solution.)

3. Add a few drops of cyclohexane to the first tube. Note whether the cyclohexane floats or sinks to the bottom. Use this observation to determine the position of the cyclohexane layer in all succeeding trials.

4. Add 1 mL cyclohexane to Test-Tubes 1-6. Stopper, shake, and loosen stopper.  Record the colors of the top and bottom layers in all test tubes. (Colors in the cyclohexane layers are due to the extraction of chlorine, bromine, or iodine into the organic layer.)

5. Save and use Tubes 1-6 for comparison later.

6. Take Tubes 4-9 to the hood.

In Tubes 4 and 7, place 1 mL KCl solution;
in Tubes 5 and 8, place 1 mL KBr solution; and
in Tubes 6 and 9, place 1 mL KI solution.
7. Place 1 mL Cl2(aq) in Tubes 5 and 6;
    place 1 mL Br2 (aq) in Tubes 4 and 9; and
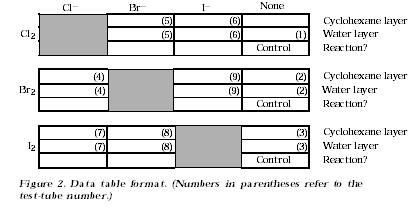
    place 1 mL I2 (aq) in Tubes 7 and 8.

Shake each test-tube after stoppering it as above. Then remove the corks and add 1 mL cyclohexane to each tube (4-9). Re-stopper, shake the test tubes to observe the layering of the halogen that is present in the tube after the initial shaking. Prepare a data table (see Figure 2). Record the colors in both layers of each test-tube.

8. Show your data table and test tubes to your teacher before discarding the tube contents in the appropriate waste container. Rinse and clean the tubes thoroughly and return them to the appropriate place in your laboratory.

9. Thoroughly wash your hands before leaving the laboratory.

Data Analysis
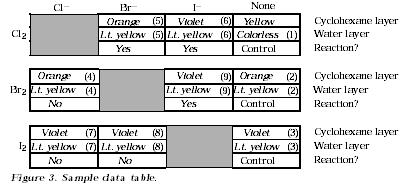
1. From the colors in Tubes 4-9 and the reagents you added, determine in which test tubes a chemical reaction occurred. (For example, if the color of the cyclohexane layer in Tube 4 is similar to that in Tube 2, no reaction occurred between bromine and the chloride ion. However, if the color in the cyclohexane layer of Tube 4 is similar to that in Tube 1, bromine has reacted with the chloride ion to produce chlorine and the bromide ion.)

2. Record your results (color) in a table such as the one shown. Also draw each tube and use colored pencils to record your results.

Implications and Applications
1. If you were given an unknown solution containing one of the halide ions (Cl , Br , or I ), what single, simple test could you use to determine which ion was in the solution? Describe the procedure and results expected for each of the three ions.

2. Rank the three halogen elements used in terms of their relative oxidizing ability, from the strongest oxidizer to the weakest.

3. How does the order of the halogens specified in Question 2 compare with their relative positions in the Periodic Table? Based on its position in the Periodic Table, would you expect fluorine to be a stronger or weaker oxidizing agent than the other halogen elements studied here?

4. Write a net ionic equation for each reaction that occurred in your trials.
 

Activity 2: Relative Reactivity of Halogens and Halides (teacher notes)
Major Chemical Concept
Halide ions and halogens differ in their tendencies toward oxidation and reduction.
Level
Activity appropriate for basic, general, and honors students.
Expected Student Background
Related concepts needed for this exercise include oxidation-reduction, ions, formula writing, equations, and periodicity. Required laboratory skills include following directions fully and the ability to handle potentially hazardous materials.
Time
40 min of work time—longer if insufficient hood space is available.
Safety
1. Read the Safety section in the student procedure.

2. Place all reagents in dropping bottles to facilitate dispensing by students. We recommend plastic bottles with nonrubber dropper tops for Cl2 (aq), Br2 (aq), and I2 (aq). If rubber dropper tops are used, check the caps and replace any that have cracks. Do not store halogen solutions in bottles with rubber dropper tops.

3. Place all solutions in scrupulously clean bottles.

Materials (For 24 students working in pairs)

See previous safety suggestions regarding reagents and reagent bottles.

The 0.1 M solutions of KCl, KBr, and KI are made by dissolving 0.75 g potassium chloride, 1.2 g potassium bromide, and 1.7 g potassium iodide, respectively, in sufficient distilled water to make up 100 mL solution. This is enough for 20 student groups. The X2 solutions are commercially available chlorine water, bromine water, and iodine water.

Waste disposal bottles to hold about 100 mL waste solutions per student group should be available (see waste disposal information in the SourceBook Safety section).

Advance Preparation
1. Chlorine water solution cannot be stored for extended periods. It has a very short shelf-life and should be tested just before students are to start the activity—i.e., check with KBr solution to ensure that enough bromine is liberated to be extracted into the cyclohexane layer. (The formation of a yellow color in the aqueous layer is not conclusive.) In an emergency, chlorine water can be prepared by setting up the apparatus shown in Laboratory Activity 1 of this module and bubbling the generated chlorine into water.

2. Inspect the KI solution for decomposition. Even if no coloration is visible, several milliliters of KI can be tested with a few drops of starch solution. A blue color indicates that a fresh solution is needed. If corks are reused from class to class, be sure they are washed thoroughly.

3. Be sure to complete the laboratory activity yourself before allowing students to attempt it.

4. Tell students to shake test tubes for a fairly long time.

Pre-Laboratory Discussion
Insure that students understand all safety instructions. Consider a brief review of related concepts (see Expected Student Background ). Stress the nomenclature distinction between halide ions (such as chloride, Cl ) and halogens (such as chlorine,
Cl2 ).
Teacher-Student Interaction
The teaching value of this laboratory activity can be increased if you move from group to group and ask students about the Part 1 extractions to ensure that they understand the difference between an extraction and a chemical reaction. Confirm that students follow safety instructions provided. During Part 1, stress the importance of allowing the aqueous components to react prior to extraction. Students may be tempted to mix all three components together, which, unfortunately, would minimize the chance of complete reaction in a short time span and may generate ambiguous results. Students should shake the cork-stoppered test tubes thoroughly to promote extraction.
Anticipated Student Results
1. Procedure Step 3 : The cyclohexane layer remains above the water layer.

2. Procedure Step 4:
        Tube 1: top (cyclohexane) layer: yellow; bottom (water) layer: colorless
        Tube 2: top (cyclohexane) layer: orange; bottom (water) layer: light yellow
        Tube 3: top (cyclohexane) layer: violet; bottom (water) layer: light yellow
        Tube 4: top (cyclohexane) layer: colorless; bottom (water) layer: colorless
        Tube 5: top (cyclohexane) layer: colorless; bottom (water) layer: colorless
        Tube 6: top (cyclohexane) layer: colorless; bottom (water) layer: colorless

3. Steps 6 and 7: See Data Table

Answers to Implications and Applications
1. Add chlorine water to the solution containing the halide ion and shake. Add cyclohexane and shake again. A yellow color in the cyclohexane layer indicates no reaction occurred—the anion must have been chloride. However, an orange layer indicates formation of bromine—the anion must have been bromide. A violet layer indicates iodine—the anion would be iodide in this case.

2. Chlorine is the strongest oxidizing agent, bromine is intermediate, and iodine is the weakest oxidizing agent.

3. The higher the halogen is located in the Periodic Table, the stronger its character as an oxidizing agent. On this basis, fluorine would be expected to act as a stronger oxidizing agent than chlorine—which is true.

4. Step 4: No chemical reactions take place.
Steps 6 and 7:

Cl2 + 2Br ---> 2Cl + Br2 (Tube 5)
Cl2 + 2I ---> 2Cl + I2 (Tube 6)
Br2 + 2I ---> 2Br + I2 (Tube 9)
Post-Laboratory Activity
Help develop the Answers to Implications and Applications Question 1 and thendemonstrate the reaction of chlorine water with an unknown halide ion solution.
Possible Extensions
1. Each student could be given an unknown halide ion solution and asked to determine which halide ion it contains, again using the procedure developed in Question 1.

2. The relative reactivity of halide ions as reducing agents could be explored by more advanced students. Iron(III) and copper(II) are allowed to react with iodide and bromide ion solutions. The iodide ion reduces both metal ions— to iron(II) and copper(I), respectively. The bromide ion is unable to reduce either metal ion.

Assessing Laboratory Learning
 
Laboratory Practical
Each student could be given an unknown halide ion solution and asked to determine which halide ion it contains, again using the procedure developed in Implications and Applications Question 1.
Demonstration Examination
Same as laboratory practical, but you would demonstrate the tests on one or more “unknowns” with students observing the results and identifying the ion in the unknown or unknowns.
Written Examination
1. Write net ionic equations for the reaction between
a. Cl2 and Br [Cl2 + 2Br ---> Br2 +2Cl]
b. Cl2 and I [Cl2 + I ---> I2 + 2Cl ]
c. Br 2 and I [Br2 + 2I ---> I2 + 2Br ]
2. Consider the data table (see Figure 4). In which trials did a reaction occur?  Explain your reasoning for each answer.
Data for combinations of Br2 and halide ions

Figure 4. Colors observed in bromine-halide systems.
[TEACHER NOTE: Bromine has not reacted with Cl or Br , since Br 2 color appears in organic layer. Br2 has reacted with I to give I2 .]

Note that another row or column could be used for this question.

3. Consider another halogen element X. An organic solvent added to an X2 solution exhibits a colorless organic layer by itself, even when shaken vigorously. When X2 solution is added to solutions of chloride, bromide, and iodide ions, the results shown below are observed.

Data for combinations of X2 and halide ions
Where does this halogen fit in the Periodic Table relative to Cl, Br, and I?

[TEACHER NOTE: This is undoubtedly fluorine, since Cl2 , Br2 , and I2 have been produced. A similar table with a fictitious element or with astatine could be developed.]

Suggestions for Other Laboratory Activities
A quantitative laboratory activity might be advisable if this material is presented late in the school year—provided you perform demonstrations that cover the principles involved in the laboratory activities presented here. One quantitative activity is the “Ferric Ion/Iodide Ion Reaction” of the Doing Chemistry Videodisc Set, distributed by the Education Division, American Chemical Society, 1155 16th Street, N.W., Washington, DC 20036.

Table of Contents Topic Overview Concept (Lab 1) Concept (Lab 2) Demonstrations
 Q's & Activities
Tips for the Teacher
 History
Humor
Media Links
Connections
References
Appendix