Demonstration 1: Halogen and Halide Reactivity Option A: The reactivity of a halogen vs. relative nonreactivity of the halide ion:
SafetyOption B: As a counterintuitive demonstration, solutions of potassium bromide and potassium iodide can be mixed with solutions of iron(III) and copper(II) chlorides.Follow the standard safety procedures for any demonstration. For this particular demonstration, be sure to:Materials1. Wear protective goggles and apron.2. Wash off any chemicals spilled on your skin or clothing with large amounts of tap water.
3. Dispose of chemicals by dissolving them in tap water and washing them down the drain with copious amounts of tap water.
Directions
- Sodium chloride (table salt) solution (any concentration) in a beaker
- Chlorine water in another beaker
- Strips of denim or other cotton cloth
Dip a strip of cotton denim into an aqueous solution of sodium chloride. Dip another strip into a fresh chlorine water solution. The strips of cloth should be large enough to be seen by all students. Pass the strips around the class after washing the strips in water to remove excess sodium chloride and chlorine.(This simple demonstration can set the stage for Laboratory Activity 1 .)
MaterialsDirections
- 1 M Potassium bromide, KBr, 10 mL (1.2 g KBr per 10 mL solution)
- 1 M Potassium iodide, KI, 10 mL (1.7 g KI per 10 mL solution)
- 1 M Copper(II) (cupric) chloride, CuCl2 , 10 mL (1.7 g CuCl2 x 2H2O per 10 mL solution)
- 1 M Iron(III) (ferric) chloride, FeCl3 , 10 mL (2.7 g FeCl3 x 6H2O per 10 mL solution)
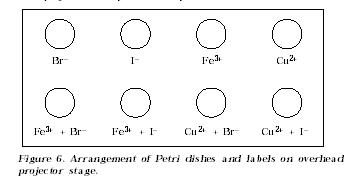
- 8 Small Petri dishes on overhead projector (image quality is best with plastic Petri dishes, intermediate with glass Petri dishes, and poorest with small beakers)
Pour a layer of the four respective solutions thick enough to see the color in four Petri dishes as controls (see Figure 6). Then pour equal volumes of the Fe3+ solution in two remaining dishes and equal volumes of Cu2+ solution in the final two dishes. Add equal volumes of potassium bromide to one dish containing Fe3+ and one containing Cu2+ . Note any color changes. Now add equal volumes of potassium iodide solution to the second dish of Fe3+ and Cu2+ solutions. Observe the color changes. (Iodide is able to reduce these ions to Fe2+ and Cu+ , respectively, with concurrent changes in the brown color of iodine in water.) As an extra touch, the brown solutions can be transferred by pipets to test tubes. Add cyclohexane, stopper, and shake to transfer the iodine to the cyclohexane layer. The violet color can be observed on the overhead projector if the cyclohexane layers are transferred to Petri dishes.
Alternatively, the demonstration can be presented on a larger scale with more dilute solutions from a demonstration bench at the front of class. In this case, color changes are more readily observed if a sheet of white posterboard is placed behind the solutions.This demonstration can be made an extension of Laboratory Activity 2. This develops a more thorough understanding of relative oxidizing and reducing abilities of redox couples as well as better understanding of halogen chemistry.
Demonstration 2: Chlorine Production by Electrolysis of a Chloride Solution Introduction
CuCl2 (aq) is electrolyzed rather than NaCl(aq) since it removes possible confusion inherent in simultaneous production of H2 (g) and Cl2 (g).SafetyFollow the standard safety procedures for any demonstration. For this particular demonstration, please be sure to:1. Wear protective goggles and apron throughout the demonstration.2. Wash off any chemicals spilled on your skin or clothing with large amounts of tap water.
3. Dispose of chemicals by dissolving them in tap water and washing them down the drain with copious amounts of tap water.
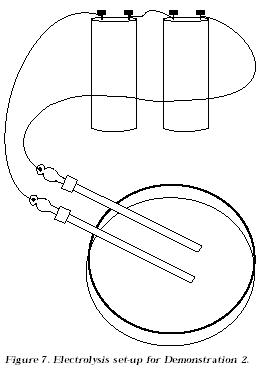
MaterialsDirections1 M Copper(II) chloride, CuCl2 , 50 mL (8.5 g CuCl2 x 2H 2 O per 50 mL solution) Petri dish 2 Mechanical pencil leads (about 6 cm long; graphite) or larger diameter graphite rods 2 1.5-V Dry cells connected in series with alligator clip leads, or a 9-V battery wrapped with tape and connectors wired to alligator clips 2 Small pieces (0.5 x 3 cm) of dyed cotton and/or litmus paper (litmus paper preferred since many dyes are bleach proof) Overhead projector Place the Petri dish containing 1 M CuCl2 solution on the overhead projector. Disconnect the wire connecting the two cells in series. Connect the alligator clips to the pencil lead electrodes. Position the electrodes in the CuCl2 solution so they are parallel and about 2 cm apart, with the top of the electrodes being supported by the rim of the Petri dish (see Figure 7). Be sure that the electrodes do not contact each other during the demonstration. (The graphite electrodes have very little resistance. If they touch, you will short the cells and create a possible hazardous condition.) About 2-3 cm of the electrodes should be submerged at an angle in the solution.Alternatively, two graphite electrodes can be taped to a 9-V radio battery (pretaped to avoid shorting out of the electrodes through the case). The electrodes should be taped at an angle that allows 2-3 cm to be submerged in the solution.
The length of the electrodes should be visible on the projection screen. Reconnect the dry cells. You may or may not wish to identify the anode and cathode. After an initial induction time of about 20 seconds, ask students what they observe. [Small bubbles should form at the anode and rise to the surface of the solution.] Allow the electrolysis to continue for about 3-4 min. Call a student to the overhead projector and ask for a report on any apparent odor. Although only a fraction of a milliliter of Cl2 gas has been produced, a distinct chlorine odor should be detectable near the overhead projector.
Disconnect the wire connecting the two cells. Skewer the piece of dyed cloth or litmus paper with the tip of the anode (see Figure 8). Reposition the anode in the CuCl2 solution as before, with the skewered part of the cloth/litmus paper submerged and the electrode beneath the cloth/litmus paper. A second piece of cloth/litmus should be partially submerged in the CuCl2 solution away from the electrodes.

figure 8.Reconnect the cells and permit electrolysis to occur for 2-3 min. Disconnect the wire connecting the cells and remove both pieces of cloth/litmus paper from the solution. Rinse the cloth/litmus in water and pass them around the room. Ask students to compare the pieces of cloth/litmus and to explain their observation. [The piece of dyed cloth/litmus not attached to the electrode may be slightly discolored due to the CuCl2 solution. The piece of dyed cloth/litmus skewered on the anode will be obviously bleached. This is secondary indication that the gas produced at the anode is chlorine. It is worth noting that litmus, a natural dye, works better than the dyed cloth.]
Remove the cathode from the solution, rinse it in water and pass it around the room for students to observe. Ask students to explain their observations. [Copper plating should be clearly visible on the cathode. The reaction Cu2+ + 2e ---> Cu takes place at the cathode.]
A discussion of commercial production of Cl2 by electrolysis of NaCl solutions could precede or follow this demonstration. Depending on when this activity is performed, you might elect to tackle the question of why Cu is plated at the cathode in this demonstration while H2 is released at the cathode in the electrolysis of NaCl. [This is because water is easier to reduce than are the sodium ions.] Try to keep emphasis on Cl2 production.
Demonstration 3: The Activity of HF(aq) as an Acid Introduction
Hydrofluoric acid is a very active weak acid. It is classified as a weak acid due to its low ionization in aqueous solutions yet, seemingly paradoxically, it can etch glass.PurposeTo use HF(aq) to etch glass and plastic and to compare the results.SafetyHydrofluoric acid is highly corrosive and thus must be handled with care. For this reason a paste form, available in some stained glass or art supply shops, is used. Do not allow your skin to come into contact with the paste. Flush the residues down the drain with plenty of water when finished. Be careful not to drop the glass sample when it is passed around the room. Wear goggles and apron while performing this demonstration.MaterialsProcedure
- Small bottle or jar of commercial HF(aq) paste, with plastic applicator
- Small piece of soft window glass, without sharp edges
- Small piece of plastic
- Tape for masking glass and plastic
- Protective plastic sheet for desk top
1. Prior to conducting the demonstration for the class, do the demonstration yourself, using scrap materials.2. Prior to the demonstration, distinguish the oxidizing power of halogens (F2 in particular) from the replacement reaction occurring in this demonstration.
3. Place a piece of tape across the middle of the glass plate. You may elect to be artistic and mask out a design.
4. Using a plastic applicator, smear a small amount of commercial HF(aq) paste across the entire glass plate including the tape.
5. Note the instructions on the container of HF(aq) paste. After a few minutes, rinse the glass with copious amounts of water. Remove the tape to display the etched glass.
6. Repeat Steps 3-5 with the piece of plastic.
7. Pass the well-rinsed pieces of glass and plastic around the room so students can observe the action of HF(aq) on the glass and the contrasting lack of reaction with the plastic.
8. Ask students to describe the difference in the glass and plastic surfaces where the HF(aq) was in contact with glass or plastic and where the tape covered the surface. [Negligible change should be observed with the plastic.] You can also ask students to write equations that represent the ionization of HF(aq) in aqueous solution:
HF(aq) + H2O(l) ---> H3O+ (aq) + F (aq)and the equation representing the action of HF(aq) on glass (SiO2 ):6HF(aq) + SiO2 (s) ---> 2H3O+ (aq) + SiF6 2 (aq)Ask students to comment on the power of HF(aq) to etch glass and to suggest reasons for this behavior. [The silicon to fluorine bond is more stable than the silicon to oxygen bond. Therefore, fluorine displaces oxygen in the glass structure. The frosted surface is the result of the once smooth glass surface becoming heavily pitted.] Consider asking more able students to indicate why the HF(aq) paste did not react with the plastic. [The bond strength for hydrogen to fluorine is about the same as the bond strength for carbon to hydrogen. The added steric hindrance associated with the smaller carbon atom (relative to silicon) together with the lack of a driving force for the reaction prevents any appreciable reaction being observed.]NOTE: If unavailable locally, glass etching cream can be obtained from Armour Products, Wyckoff, NJ 07481; (201) 847-0404. Call to determine a retail outlet in your area. Cost: about $6.00 for 3 oz.
Demonstration 4: Halogen Elements and Vapors Option A:The sublimation of iodine makes a good demonstration.
SafetyOption B:
Follow the standard safety procedures for any demonstration. For this particular demonstration, please be sure to:1. Wear protective goggles and apron throughout the demonstration.Materials2. Wash off any chemicals spilled on your skin or clothing with large amounts of tap water.
3. Save the iodine for future demonstrations. Small amounts remaining on container surfaces can be washed from the vessels with scrubbing and then washed down the drain with copious amounts of tap water.
Directions
- Plastic coffee can lid
- Large beaker, size depends on size of coffee can plastic lid or cover
- Small beaker filled with ice/water/salt mixture for cooling
- A few iodine crystals, I2(s)
- Hot plate
Cut a hole in the coffee can plastic lid, allowing the small beaker to be suspended over the large beaker. Iodine crystals are placed in the large beaker, which is placed on the hot plate (low heat). Dark iodine crystals sublime as beautiful violet vapors and condense on the outer surface of the cold small beaker.
Demonstrate by textbook illustrations, by a photographic Periodic Table, or other media presentation the appearance of other elements and their vapors. Media sources are provided in the Media section.Suggestions for Other Demonstrations
1. Other demonstrations are possible. See for example, Shakhashiri,Chemical Demonstrations, Volume 1:2. A number of oscillating reactions also contain halogen compounds, but details of these reactions are often over the heads of high school students. On the other hand, able students can be challenged by such reactions; c.f., Epstein, I. (1987). Chemical and Engineering News, 65(13), 24-36. Two overhead projector oscillating reaction demonstrations appropriate for this module are found in a short note by Kolb, D. (1988). Journal of Chemical Education, 65(11), 1004.
- Demonstration 1.25: Reaction of Sodium and Chlorine
- Demonstration 1.26: Reaction of Antimony and Chlorine
- Demonstration 1.28: Reaction of Aluminum and Bromine
- Demonstration 1.29: Reaction of White Phosphorus and Chlorine
- Demonstration 1.30: Reaction of Red Phosphorus and Bromine
| Table of Contents | Topic Overview | Concept (Lab 1) | Concept (Lab 2) | Demonstrations |
|
|
Humor |
Media | Links
Connections |
References
Appendix |
|---|