
LABORATORY ACTIVITY: STUDENT VERSION
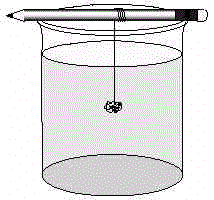
Atoms, molecules, and ions can fit together in a regular pattern to form a crystal. There are several types of crystals and crystalline structures. One of the ways to grow crystals is to allow water to evaporate so that the ions or molecules can come together to form crystals.
Purpose
To investigate sugar and salt crystals. To produce salt crystals by allowing sodium ions and chloride ions to come together in solution. To produce sucrose crystals (sometimes called rock candy) by allowing sugar molecules to come together in solution.
Safety
Wear protective goggles throughout the laboratory activity.
Procedure
Part I. Preparing Salt Crystals

Part II. Preparing Sugar Crystals
Data Analysis and Concept Development
Implications and Applications
LABORATORY ACTIVITY: TEACHER NOTES
Major Chemical Concept
Substances crystallize in predictable, regular patterns.
Level
General or Basic
Expected Student Background
None.
Time
45 min the first day and 5 min on successive days (for observations).
Safety
Students should be reminded not to taste anything in the laboratory, even things that can ordinarily be ingested.
Materials (For 24 students working in pairs)
Nonconsumables
Consumables
Advance Preparation
No advance preparation is needed.
NOTE: A heavy-gauge pre-soaked string works best since it will tend to sink.Pre-Laboratory Discussion
This activity might be preceded by showing shapes of some naturally occurring crystals and speculating about what might happen when solids are crystallized by evaporation. A discussion of the changes in concentration of a solute that occur when the water evaporates will help students understand what happens in the activity. The terms "dissolve" and "saturated" should be reviewed.
Teacher-Student Interaction
This activity is easy to perform and little interaction is needed. If necessary, students can be reminded that if solid remains in the beaker after heating, the solution is saturated, and no more solute should be added.
Anticipated Student Results
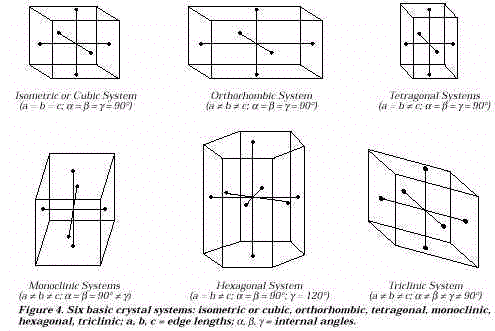
Both sugar and salt crystallize in the cubic form. Students may observe several smallcrystals or fewer larger ones.
Answers to Data Analysis and Concept Development
Answers to Implications and Applications

3. As water evaporates, the solution becomes saturated and crystals begin to form.
Post-Laboratory Activities
After the crystals begin to grow, a discussion of equilibrium would be appropriate if this topic was previously introduced. The six crystal systems (Figure 4) and examples from the mineral world may be introduced.

Extensions
LABORATORY ACTIVITY: STUDENT VERSION
Activity 2: Identification of Minerals by Borax Bead Tests and Flame Tests
Introduction
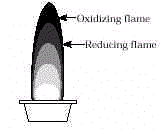
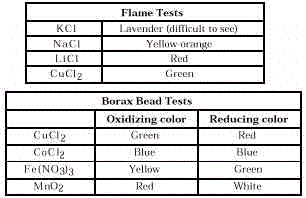
Two simple tests that can be used to identify the metal ion in minerals are flame tests and borax bead tests. Both use only simple equipment and require a short amount of time. Borax beads can be made in different colors depending on whether a reducing or an oxidizing flame is used.
Purpose
To identify metal ions through flame tests and borax bead tests.
Safety
Wear protective goggles throughout the laboratory activity.
Procedure
Prepare a data table to record your results.
Part 1. Flame Tests
Part II. Borax Bead Tests
![]()

Data Analysis and Concept Development
Use your data table to determine the identity of your unknown.
Implications and Applications
Can a mineral be identified by flame and bead tests alone? Why or why not?
LABORATORY ACTIVITY: TEACHER NOTES
Activity 2: Identification of Minerals by Borax Bead Tests and Flame Tests
Major Chemical Concept
Metal ions can be identified by flame and borax bead tests.
Expected Student Background
Students should be able to:
Time
45 minutes
Safety
Remind students about hazards of operating burners and using 6MHCl.
Materials (For 24 students working in pairs)
Nonconsumables
Consumables
Advance Preparation
Pre-Laboratory Discussion
Remind students of safety hazards. Demonstrate the oxidizing and reducing portions of the flame.
Teacher-Student Interaction
Students sometimes need to be reminded to make observations as quickly as possible after the wire has been put into the flame. When the wire becomes red hot, the flame will appear orange regardless of the substance being tested.
Anticipated Student Results

Answers to Data Analysis
Will depend on identity of student’s unknown.
Answers to Implications and Applications
These tests identify only the metal ion. Other tests such as density, color, cleavage, and scratch test will give further information to help in identification (see MECC computer simulation in Media).
Post-Laboratory Discussion
Relate these tests to similar tests that might be made on minerals.
Extension
If time permits, obtain mineral samples from the geology or earth science teacher and allow students to perform the tests with them. Check any minerals for possible hazards.
Assessing Laboratory Learning
The extension may be used for assessment. If you do not wish to use actual minerals, prepare unknowns from the salts used in the activity.