Using RealVideo and SMIL to produce
interactive streaming video for the WWW
John I. Gelder
Department of Chemistry
Oklahoma State University
218th American Chemical Society Meeting
New Orleans, Louisana
August 25, 1999
Abstract of this talk:
SMIL (Synchronized Multimedia
Integration Language) is a new language for creating
interactive WEB pages which contain different forms of
media. The latest version of productivity tools by Real,
Inc. (RealProducer G2) have integrated some SMIL
interactivity. During the summer of 1999 several examples
of WEB-based materials have been developed which
integrate digitized video segments with some measure of
interactivity using SMIL. Examples of two different types
of approaches have been developed. The first focuses on a
sample exercise demonstrating the application of a
particular concept. A video plays showing the problem
being worked out and at particular points the video stops
playing and the student is expected to answer a question.
After answering the question the video can be continued.
This continues until the exercise is completed. In the
second example, a video, introducing a concept is played.
A series of questions are then asked to assess the
student's understanding of the material. Each question is
linked back to a particular sequence in the video to help
connect the question to the discussion. Examples will be
demonstrated. The author will also discuss the current
productivity tools for developing RealVideo/SMIL
materials.
This talk is available at
intro.chem.okstate.edu
RealNetworks
and Apple
have released system extensions/or plugins which can be used to
display digital video in a WWW browser. Video can be captured
using a video capture card and edited using software like Adobe
Premier. The captured video can be saved in .avi format
(common to PC's) or QuickTime format (Apple). Video files in
these formats can be converted to realvideo files which can, like
QuickTime be accessed using a plug-in from your web browser.
Examples of RealVideo or QuickTime movies can be found on news
web, entertainment sites and educational sites.
In the past the complete video file had to be
downloaded before it could be played by the QuikTime or RealVideo
player. Streaming is the current technique of delivering video.
When a video file is streamed as it is download the player the
video begins playing as soon as a portion of the file has been
downloaded (buffered). The user will see the video play even
though the complete video file has not downloaded.
News and entertainment web sites are interested
in streaming video to the user in a relatively simple way. The
user may click on a button to play a brief report, or to see a
trailer for a movie. Nothing else is happening in the user window
as the video is playing. As a teacher I am also interested in
playing digital video segments. However, I have found HTML,
HyperText Markup Language somewhat limiting in implementing some
of the things I am interested in doing. SMIL, Simulated Multimedia
Integration Language is a mark-up language similar in
respects to HTML, HyperText Markup Language, but its use is to
integrate different media feeds and play them over the internet.
Using SMIL one can integrate an audio file with a series of
slides and play the combination in a browser. Timing slides to
change at particular points in the audio presentation. It can
also be used to integrate a video file with standard html files,
so different HTML pages appear at particular points during the
playing of the video. I'll explain more in a moment.
Most of my professional life I have been
developing computer materials for use in introductory chemistry.
In the early 1990 I taught a distance learning AP Chemistry
course. The course was delivered live by satellite to rural high
schools around the country. I had received a grant from NSF to
support a year of development and to help defray some of the
costs to the participating schools during the first year of
delivery. The second and third year of delivery were support by
fees to the high schools and some funding from the State of
Oklahoma and the College of Arts and Sciences at Oklahoma State
University. As a result of the three year of teaching the class I
have a collection of videotape broadcasts. I've always wanted to
digitize the videos and edit them to make available to my
introductory students. Over the years I have been digitizing
video, using expensive digitizing boards. These boards would
allow capture of static images. As computers became more
powerful, so did the digitizing boards. Then software became
available to play digital video on the computer. But I've always
felt somewhat limited in how I could play the digital video and
accessiblity was also a major issue. Since the development and
expansion of the Internet and explosive use of Web browsers on
the Internet new options have been generated for making video
materials available to my students. As the Internet grew in use
and power these accessibility issues began to become smaller.
There were other problems as well; quality of the digital video
and speed, both over the Internet and with the computer playing
the digital files. There were also limits in how the video could
be presented. I was alway interested in playing the the video
within the context of some lecture notes. Finally I've always
been concerned about how passive the student is when using
resource materials. Sitting passively watching a video
presentation about a chemistry topic can be boring. Digitizing
the same video and playing it over the Internet despite fancy
layouts can still be boring. It would be better, if the student
sees a need to review some information, can access the
information at anytime, from any place, on any system, and there
is some measure of interactivity integrated into the digital
video. Several years ago I had attended a demonstration of some
software which integrated a slide or video sequence with HTML
pages. The screen consisted of a group of frames one with the
video, one with an outline of the presentation and a third frame
containing text content. The example I saw showed a video feed in
one of the frames, an outline of the class in a second frame and
the third frame contained slides containing text. The slides
would change at particular points during the presentation, much
like a faculty member replacing overhead transparencies during a
lecture. But as I recall the software was independent of a
browser. As recall a feature that would be available in a soon to
be released version was the ability to display a web page in one
of the frames.
During the Spring I contacted Computer
Information Services on OSU's campus to talk to them about
several 'network' questions I had. After the meeting was
concluded one of the network guys asked if I was aware CIS had
obtained a RealVideo server and a software license for the
RealVideo player. I was not aware of this and asked if they could
give me a demonstration. During the demonstration the head of
Network Services walked in and indicated he was willing to
support me if I had a project which could use their video server.
Following some discussion I was invited back to receive some
instruction on how to use their system for digitizing video.
There production system consisted of a dual Pentium II 300 MHz
system with a VCR, video capture card, video capture software and
the current version of RealProducer Pro (G2).
I had videotapes of my Chemistry By Satellite
broadcasts and brought a few over to digitize segments and to
begin to learn about capturing and digitizing video and producing
RealVideo files which could be accessed over the Web. I thought ,
'Man, I'll generate a bunch of stuff this semester and use it in
my class.!' Well, needless to say, even though I spent quite a
bit of time working I did not really get as much done as I hoped.
I thought it was going to be ease, after all, there was lots of
video on the Web, all you had to do was download and install the
player, click on a button and watch the video! How hard could it
be to generate a video and link it to a button on my Web page? I
found out!!
Actually, the easy (but time consuming) part is
digitizing the video, the difficult part was using RealProducer
to generate ALL the files required to support that little button
on your Web page. As I began using the version of RealProducer I
discovered one of the features of the software was that it could
load an HTML pages at any point within the video. USing a
timeline 'like' interface it was possible to attach a URL to a
particular frame in the video file. It was possible to attach a
URL anywhere within the video from the first frame to the last.
Then when the video was compressed the URL's were encoded using
SMIL tages so web pages were loaded at user defined frames as the
video played. Now it appeared that the RealProducer software
could integrate the video with HTML pages in a web browser. This
was my first introduction to SMIL.
I'm not going to go into a detail discussion of
SMIL, but it is a tag based language, like HTML, which integrates
different types of media streams. Using a text editor one can
link realvideo, realaudio, and realtext files simulataneously
into a browser pages. To date I have not developed using a text
editor, but using RealProducer Pro G2. Other software that will
also produce such files has been developed TAG. As I understand
QuickTime 4 will not do what the Real products do with SMIL.
At about the same time I was digitizing some of
my video and learning about Real Producer Pro G2, a request for
proposals was announced through a Howard Hughes Faculty
Initiative Program on campus. Funding was to be available to
faculty to develop materials for 'high-risk' classes to help
increase student retention and increase student success. So I
wrote a proposal, and
received funding to develop some RealVideo materials for an
introductory chemistry course for engineers and pre-medical
students. The maximum amount of money that could be requested was
$15,000. The money was used to provide salary for developing
materials, the purchase of hardware and software, and some
student support.
The proposal I wrote described my plan to
develop interactive WEB-based tutorials that integrate RealVideo
digital movies, Shockwave animations, HTML and Java/Javascripting
to introduce fundamental chemical concepts and help students with
their problem solving skills. The tutorials are to be interactive
to engage the student in the subject. The more engaged the
students have to be, the more interested students become in the
subject.
To obtain the interactivity I planned to use a
new dynamic language based on SGML (Standard Generalized Markup
Language) called SMIL (Synchronized Multimedia Integration
Language) which had recently been approved by the World Wide Web
Committee. SMIL has a tag structure like HTML, but this language
supports the integration of RealVideo, RealAudio, RealText and
RealPix and other media types into a `timeline' like environment
that allows for greater interactivity over the Internet.
The proposal was funded and I purchased a
Pentium III 500Mhz with a 9+ gig SCSI HD, 128 Megs RAM, 19"
monitor with 10/100 Mb internet card and a VCR. CIS generously
gave me an Osprey 100 digitizing card and provided me with a 100
Mb internet connection. To date I have purchase Adobe Premier 5.1
and CIS has also given me a copy of RealProducer Pro G2 which
they have a license for. CIS also has a dedicated RealVideo
Server which will support up to 400 connections. I then proceeded
to experience the frustration of waiting for accounts to be
established, purchase orders to be processed, and equipment to be
shipped.
Since we do not have a connection to the
internet in this room I'm going to show some slides to provide
some idea of two ways I am using digitial video. Everything that
I will show you this morning is currently available on my web
server at intro.chem.okstate.edu. Look for the RealVideo Project
link in the left frame of the browser window.
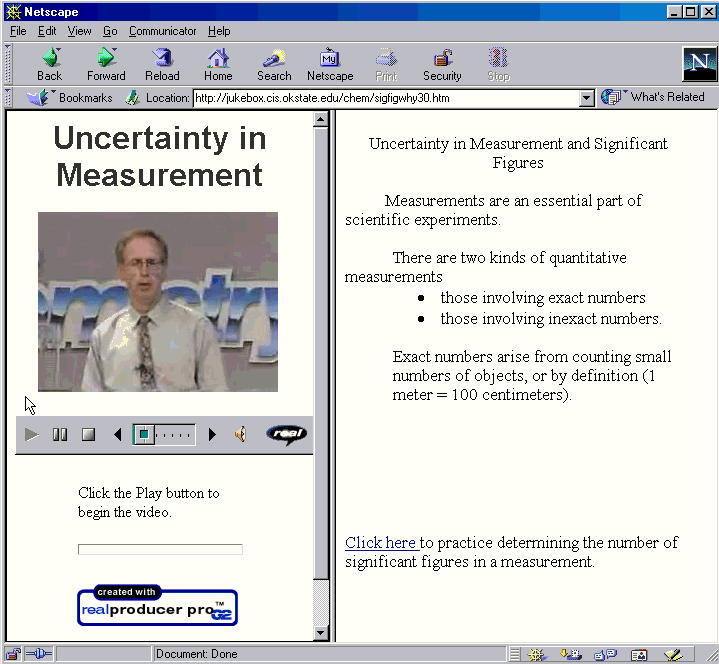
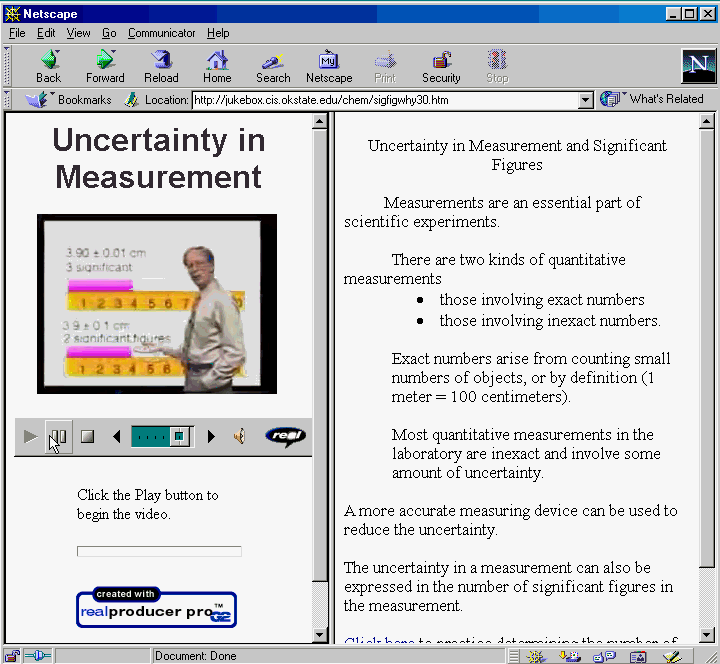
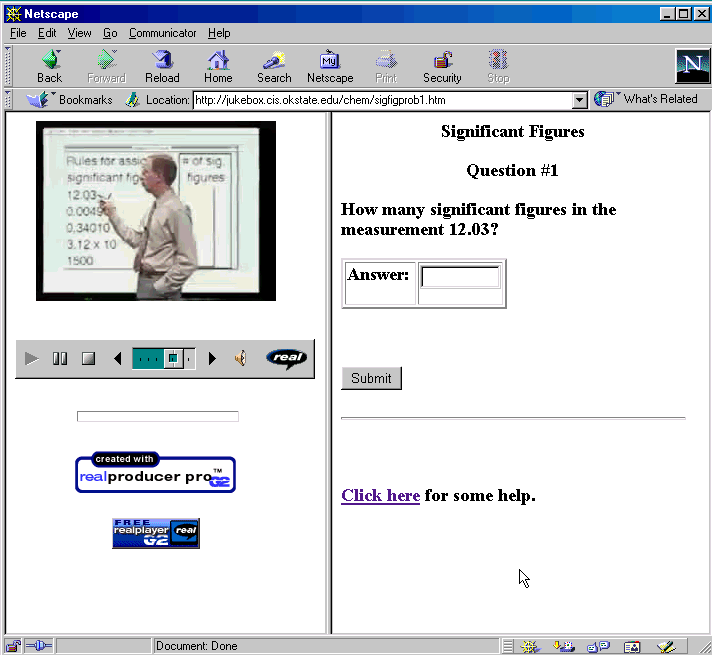
The first slide shows a Netscape window split
into two frames. In the left frame is the embedded RealVideo
player with the standard user controls. It is possible to
associate some text in fields above and below the video window in
this frame from within the RealProducer Pro G2 software. In the
right frame is in html page which I created using an HTML editor.
In RealProducer Pro G2 I attached the URL of this page to the
first frame of the video. So when the user clicks on play using
the video controls the page on the right is loaded. I should note
that URL can be any URL on the internet! The HTML page contains a
little information summarizing what I'm saying in the video.
As the video continues to play I continue to say interesting
things, so I update the HTML page at a particular frame in the
video.
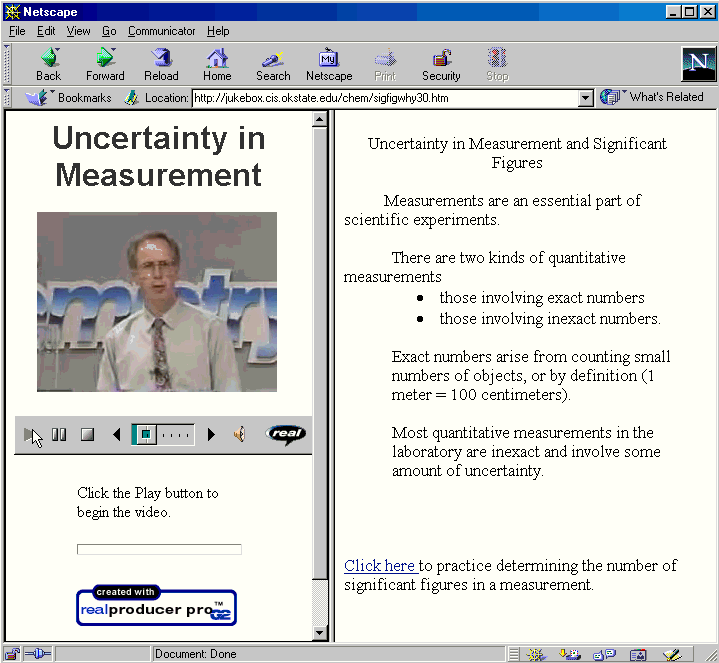
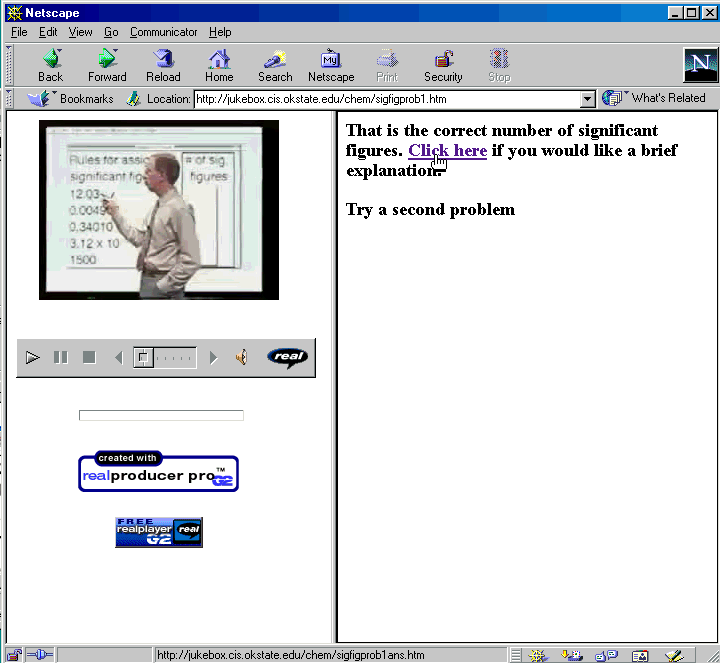
This continues as the video plays.
Note at the bottom of the page is a link which the user can
select at anytime to practice determining the number of
significant figures in a measurement.
So the user has the option to listen/watch me discuss the
importance of uncertainty and how limits in measuring devices
introduce uncertainty in measurements and how we express
uncertainty using significant figures, or, the user can click on
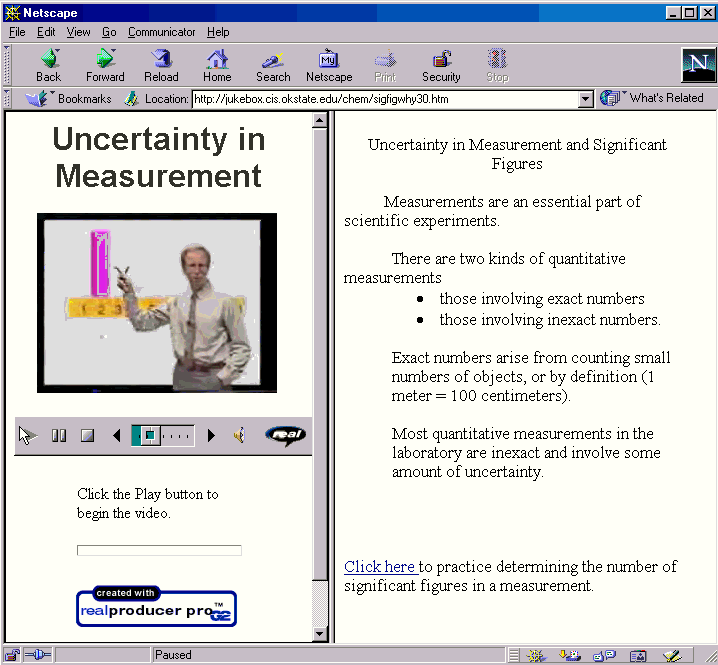
the link and go to a different video. The following two slides
show additional HTML pages which appear with this video file.
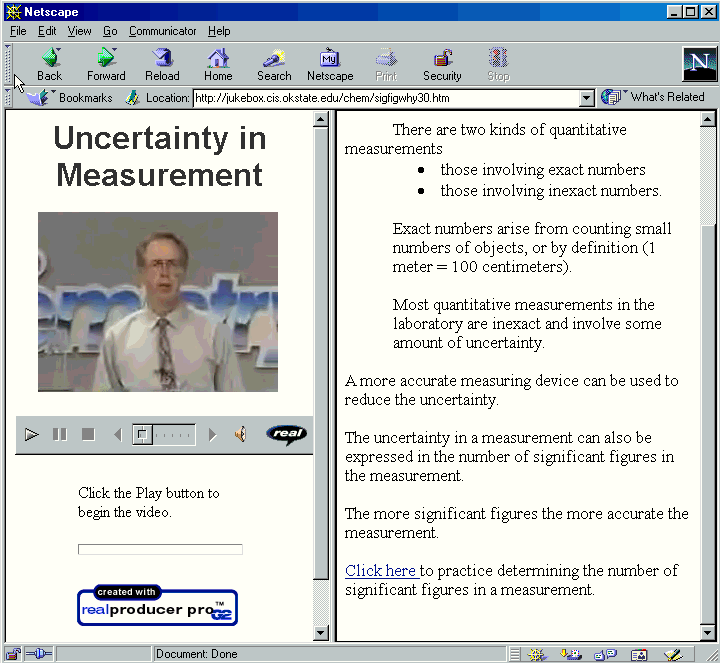
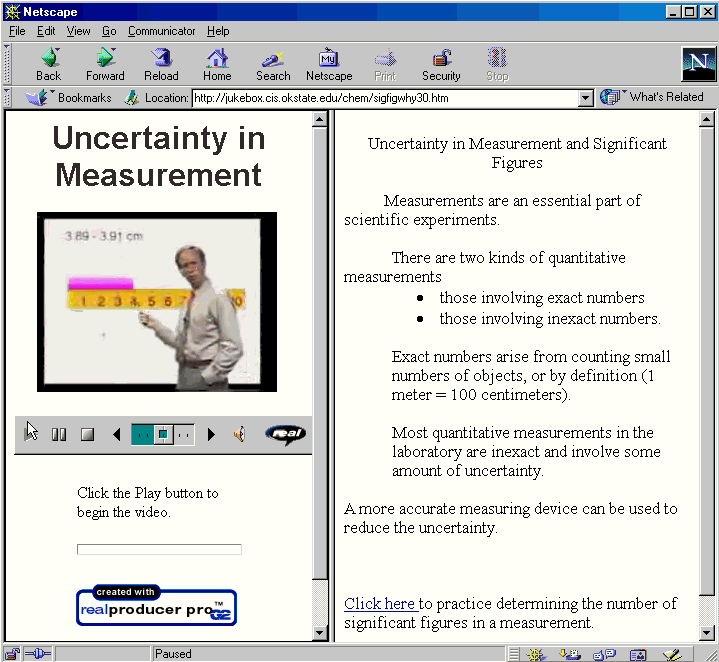
After the uncertainty video sequence a new video file is
streamed which presents a series of measurements and the goal is
to determine the number of significant figures in each
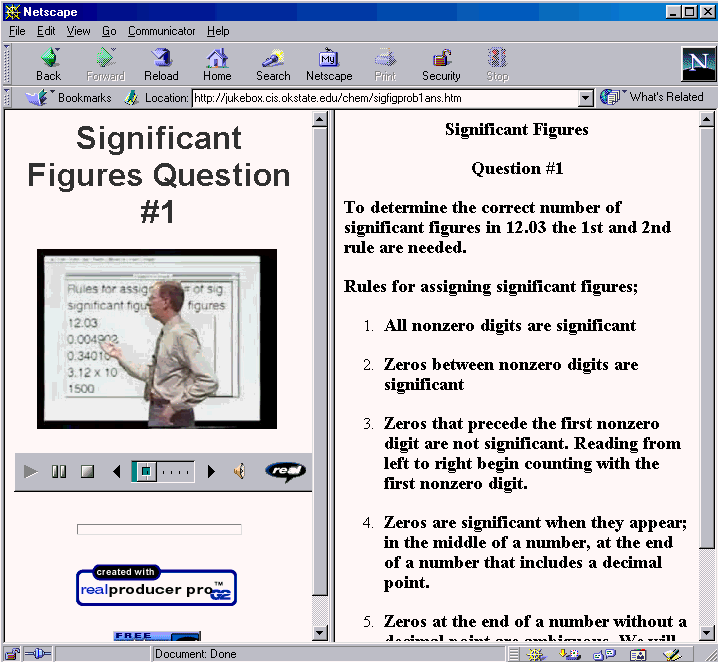
measurement. In this sequence I discuss the five measurements in
general terms. I used the HTML frame to display the rules for
assigning significant figures. Again at the bottom of the page is
a link to the next video segment.
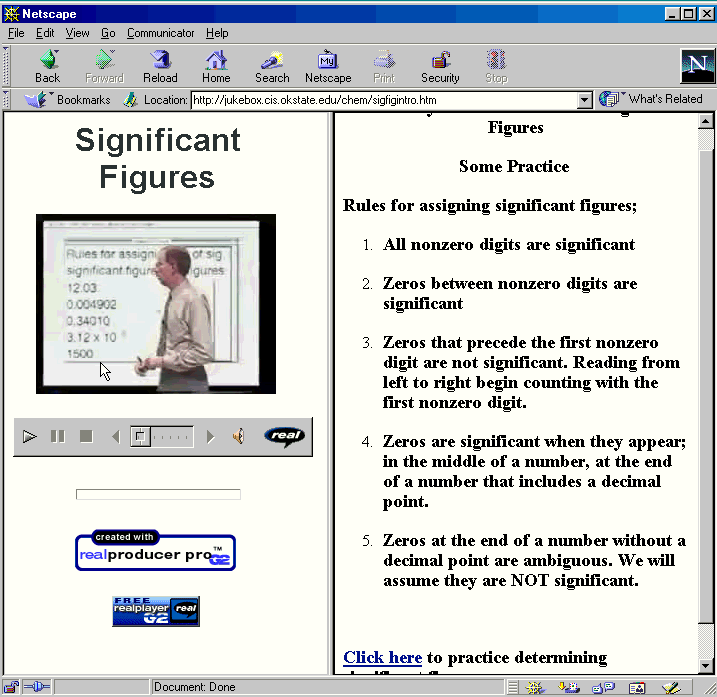
By the end of the video all five rules have been listed. Now
the user is ready to go to the next video sequence.
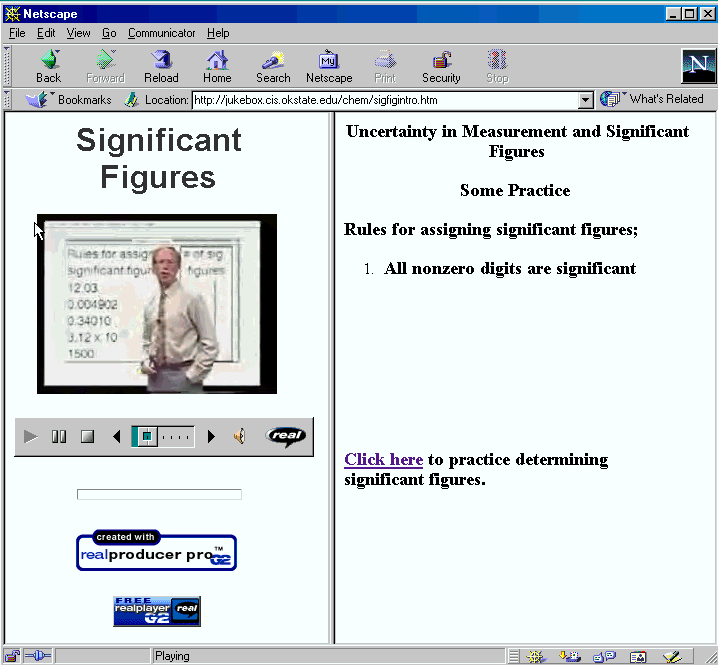
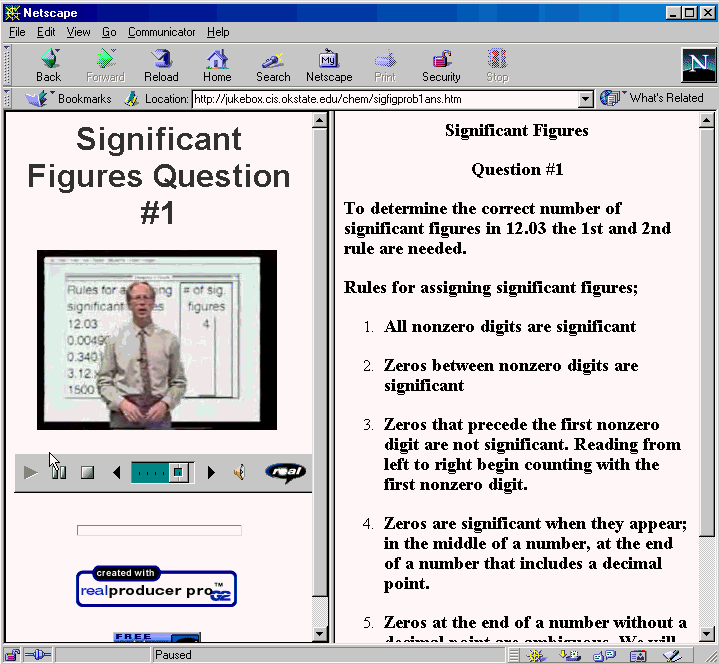
In this the HTML page is different. In the previous two
segments the user was relative passive, the interactivity was
limited. They could replay the video or link to another video
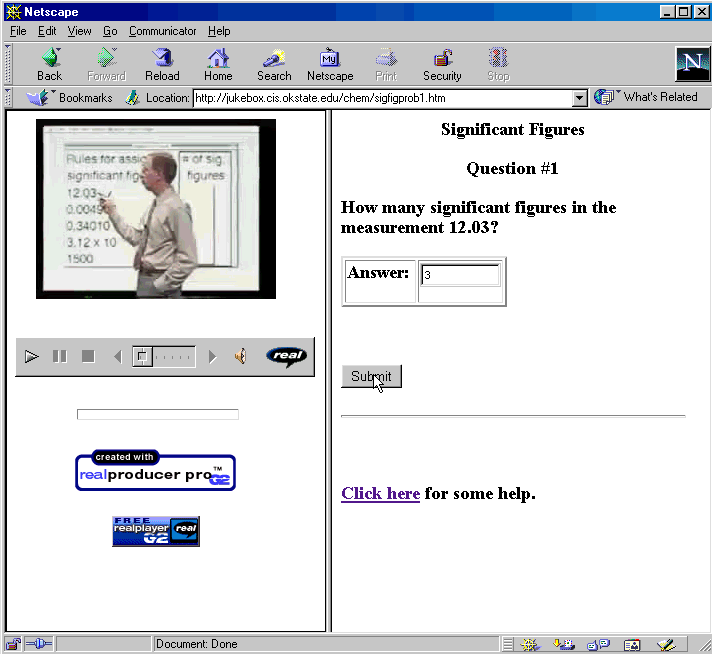
segment. But in this instances the right frame contains an input
field. On the video I'm talking about the first measurement,
discussing how we apply the rules to determine the number of
significant figures in the measurement. However, the video
segments stops before I reveal the answer, and the rule(s) that
are to be applied for determining the number of significant
figures in the measurement.
The video plays and the user is expected to enter a value for
the numebr of significant figures. The help button will load a
video sgment of me discussing the rule(s) important for
determining what numbers are significant in the particular
measurement. The user can enter a value and some relatively
simple evaulation takes place and provides feedback to the user.
In the above case the user has entered an incorrect value for
the number of signifcant figures. And the slide below shows the
response. Between these two slides the contents of the right
frame are changed/updated, but the left frame does not change.
The user can replay the video, if there is a need to review. The
student could also go back to a previous video to replay an
earlier explanation of significant figures. In the current layout
this would be done by selecting the back button. In the next
version I plan to have a frame listing all the video segments for
the particular sequence and whether they have been viewed or not.
Students will be able to return to any segment previously viewed
and depending on the design of the material to particular
segments that have not yet been viewed.
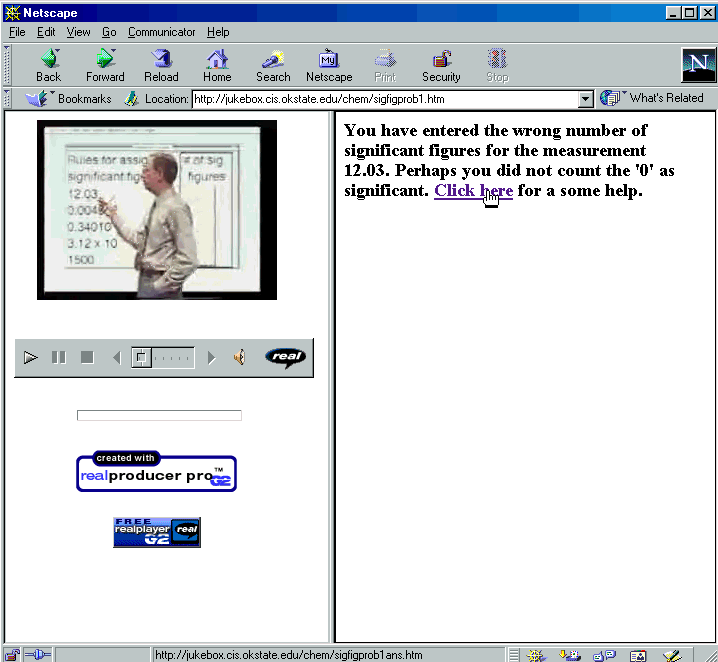
In the feedback the student can now review a video segment
showing an explanation of how the number of significant figures
is obtained. If the student clicks the back button they can enter
another answer.
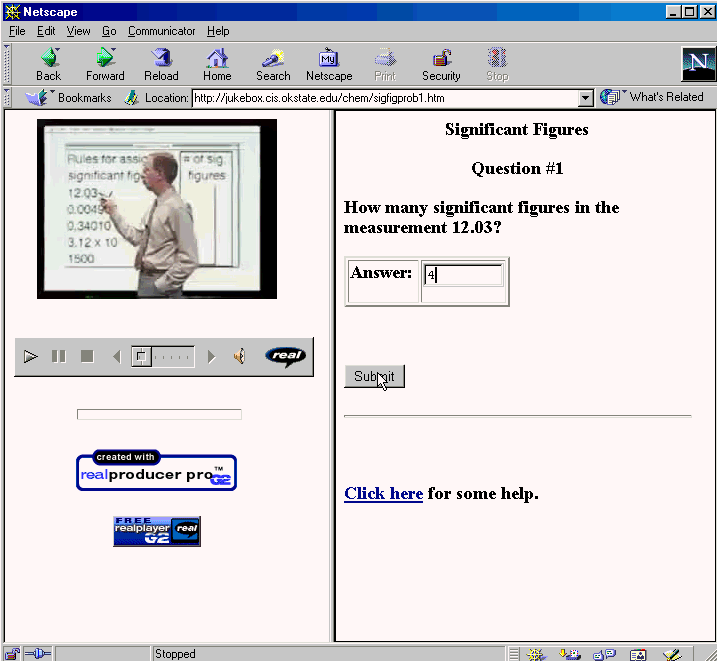
Even when the correct answer is given the student has the
option to see the explanation segment of the video. The student
also has the option to go on to the next measurement to determine
the number of significant figures.
Here is the first HTML page displayed at the beginning of the
explanation segment. It shows the rules and indicates which one
are applied in determining the number of significant figures in
the measurement.
In the final frame the correct answer is revealed in the
video and on the HTML page loaded in the right frame.
The series of slides that follow I show the RealProducer Pro
G2 software and important details of creating one of the
video/linked URL sequences discussed about. The first slide shows
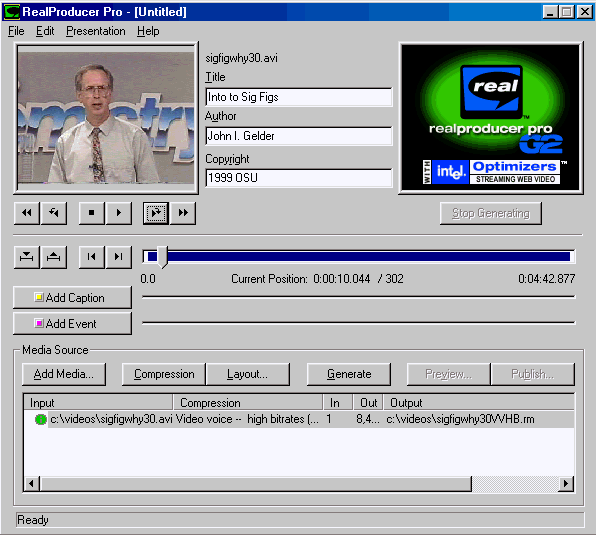
the RealProducer Pro G2 main window.
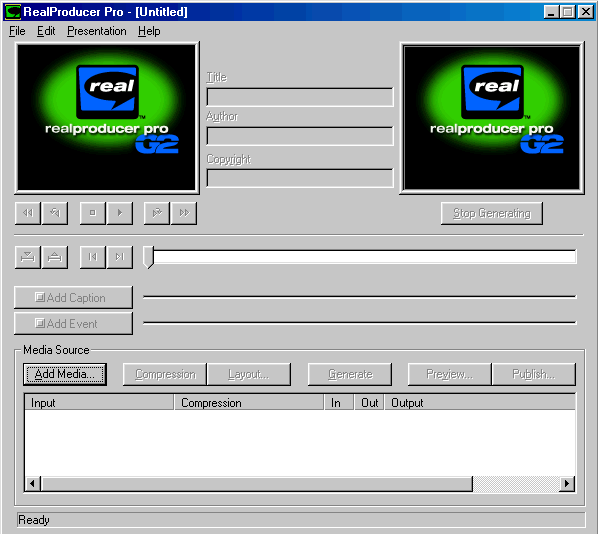
The top third of the window shows the a video window on the
left for the input video segment. On the right is a video window
which will display the final compressed and encoded video
sequence. Below the left video window are the standard controls
to move throught the video file. In the mid portion of the window
is the timeline. Note at the bottom of the window the input Media
Source is identified, as is the compression method, the size of
the output file and the name of the output file.
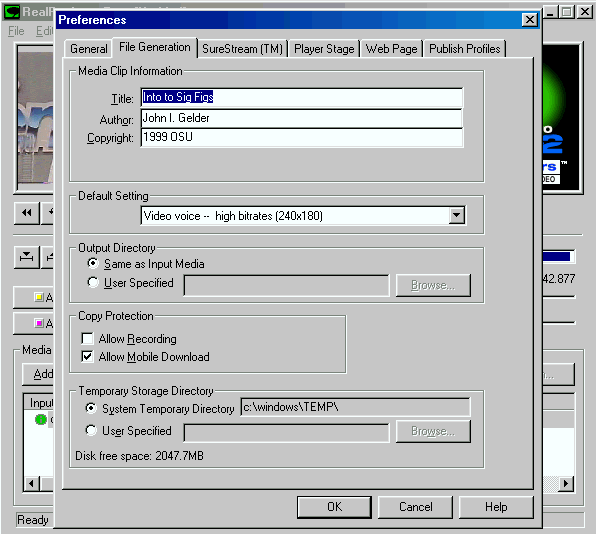
The next series of ten slides show a number of parameters
that must be setup for generating the compressed and encoded
RealVideo file and the associated HTML and SMIL files. Many of
the parameters are default values and do not require too much
changing.
The General Preferences are left unchanged from default.
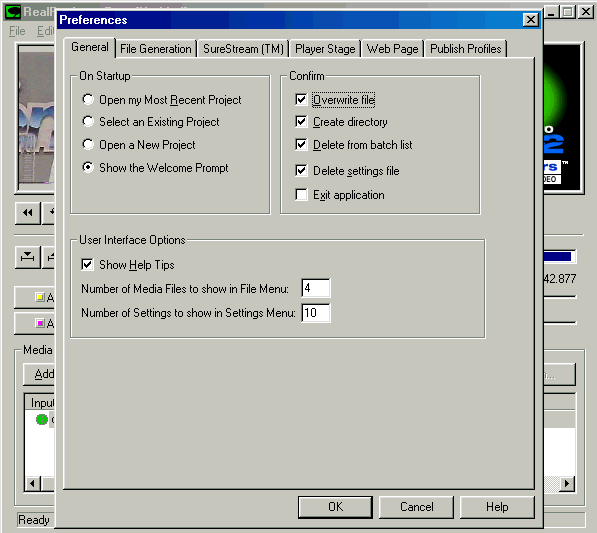
The author can add info about the title, author and copyright
infromation on this preference. Most of the other entries are
left unchanged.
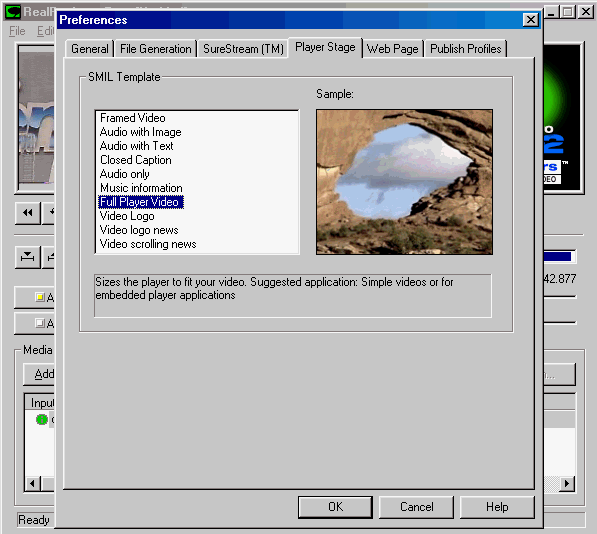
There are a variety of choices of how the video window looks
in the left frame of the browser page. The author can select the
template of choice.
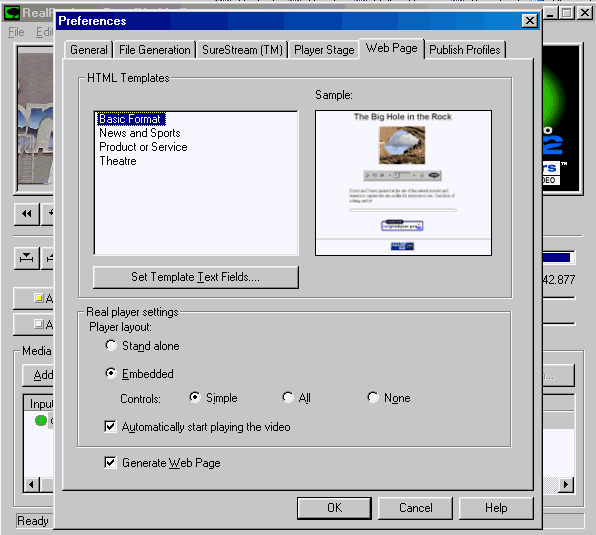
There are also variety of choices of the layout of a few text
lines and the placement of the video window relative to the
textlines..
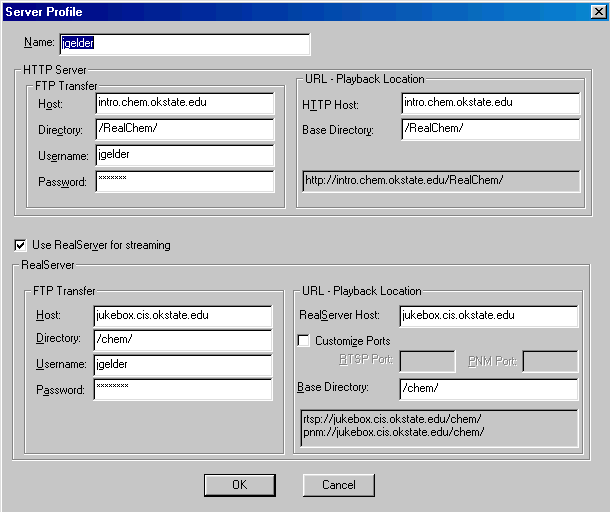
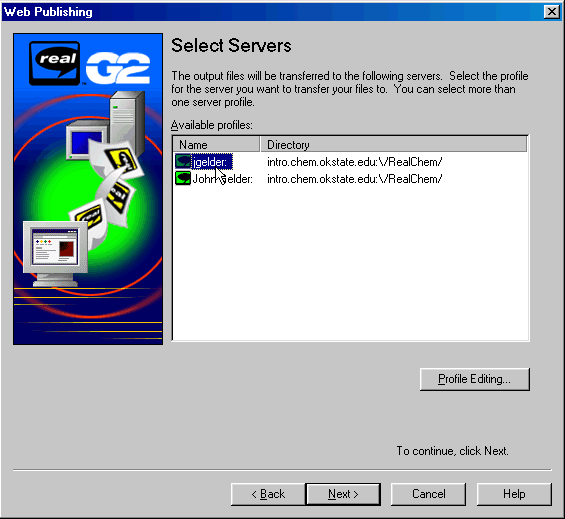
Finally the publisher profiles is a very important preference
that must be setup completely by the author. This preference is
very important because it establishes where the RealVideo server
is onthe web, and where any Web servers are that are used.
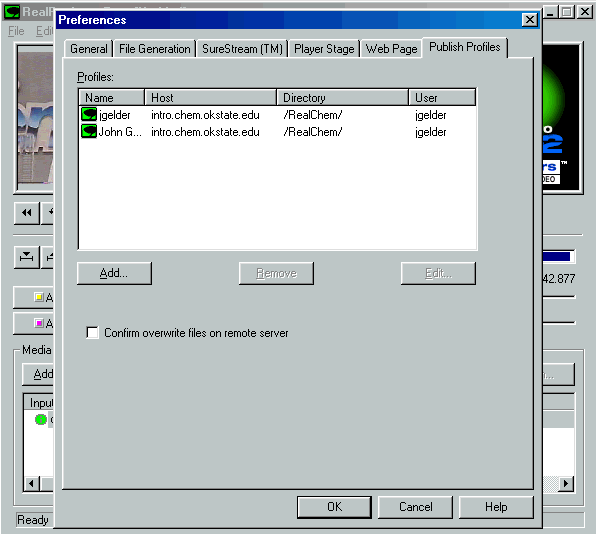
The RealServer is the location where the author wants the
compressed and encoded RealVideo file placed. The RealProducer
Pro G2 will ftp the file to the server. I guess RealNetworks
assumes the RealServer is a different computer than the computer
used to generate the RealVideo files. hat is the way it is at
OSU. So I have to have access to the RealVideo Server so I can
ftp the RealVideo files to the server. The HTTP server is the
name of the Web server which will hold the framed web pages which
are generated, the SMIL page and several additional text files
with extensions important for everything to work properly. The
HTTP server can be the same as the VideoServer, bt it can also be
different. The HTTP server address is required to access the
browser window page (identified as the ourput file in the
RealProducer Pro G2 main window). So if I place a button on an
HTML page to load the window which contains the RealVideo
embedded player the link that is loaded when the button is
selected is located at the HTTP Server identified in the Server
Profile. This was one of the more difficult preference pages for
me.
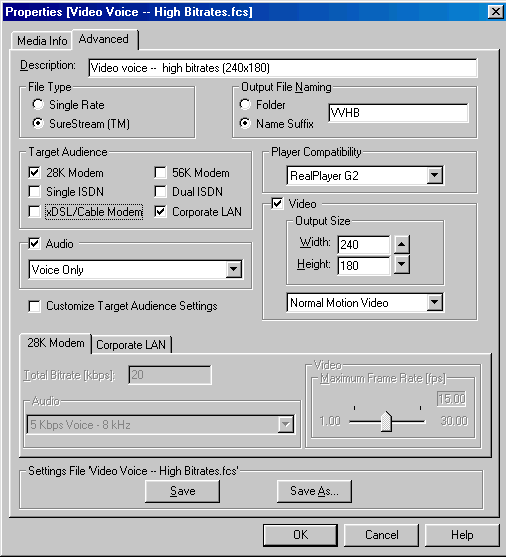
The Properties menu item contains two important preference
settings pages.
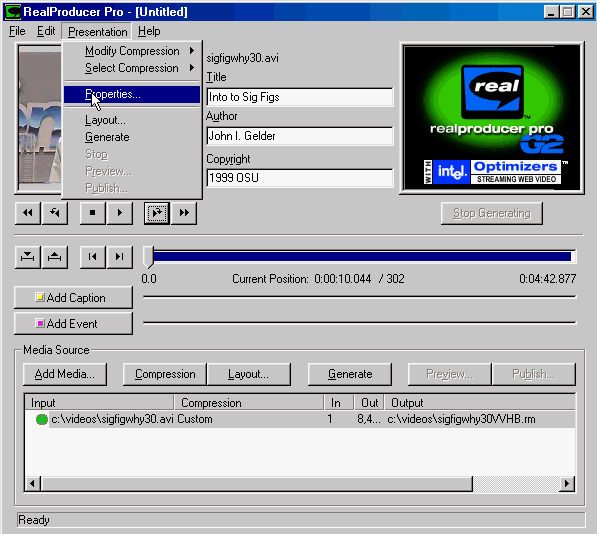
The Advanced page specifies details of video window sizes,
some choices of video display features associated with
compression, what speeds the target audience will use to download
the RealVideo file, what type of audio is used (voice or music),
and bit rate and frame rate issues. This page is essentially the
compression preferences page and there are several default
choices that have already been provided. As a newbie most authors
would leave the settings at default. Those more adventuresome
could play with the settings and see how that effect the
RealVideo that was produced.
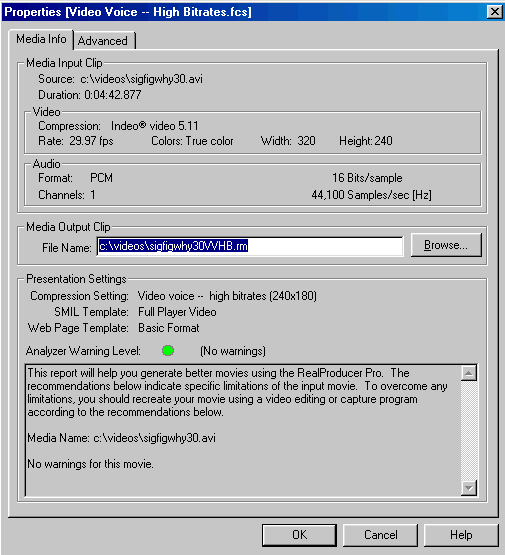
The Media info page displays information about the input
source and what the name of the output RealVideo file will be.
Sometimes it will be important to be able to change the name of
the output RealVideo file.
The 'Add Event' button is used after advancing the video as
shown in the left video window to a point in the video where the
author wants to locate a particular URL.

Clicking on the Add Event button brings up a dialog box as
shown below. If the author wants the HTML page to appear in a
different frame in the browser window then the frame must be
named. The software knows the author wants two frames when the
Add Event button is selected. A name of the frame is required so
it is known where on the page the author wants the HTML page
displayed. As well as I understand at this point the choice of
size of the frame and the frame's location is defined by the
RealProducer Pro G2 software. Any changes would have to be done
on the finished pages which are created by the RealProducer Pro
G2 software, using a text editor.
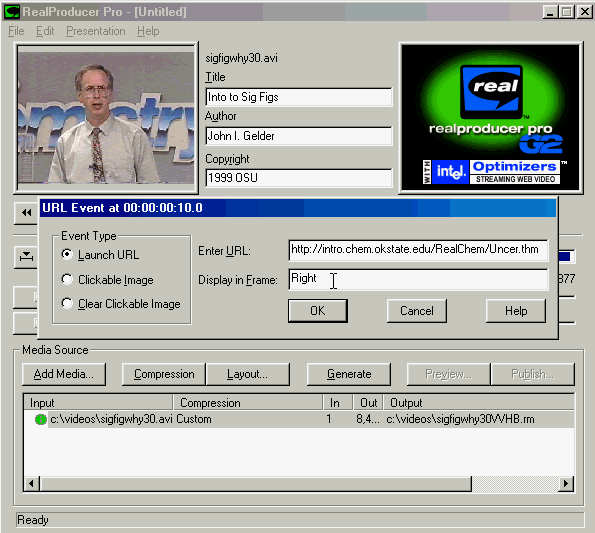
Here anothe event is going to be added.
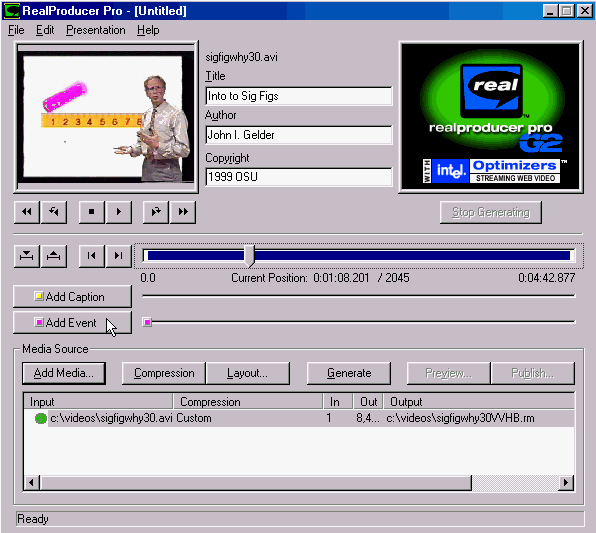
In this slide one sees four events have been added to the
video.
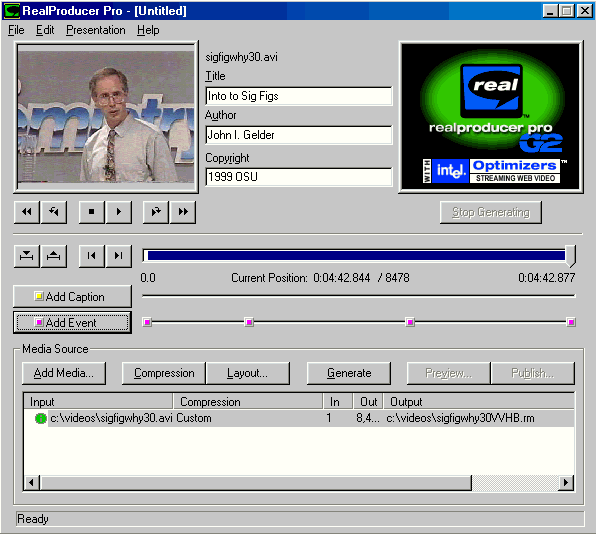
Now that all the preference information has been set, all the
eveents have been added, the author is ready to generate the
compressed and encoded RealVideo file, and all the HTML and SMIL
files, and the additional text files required by the software to
'work'.
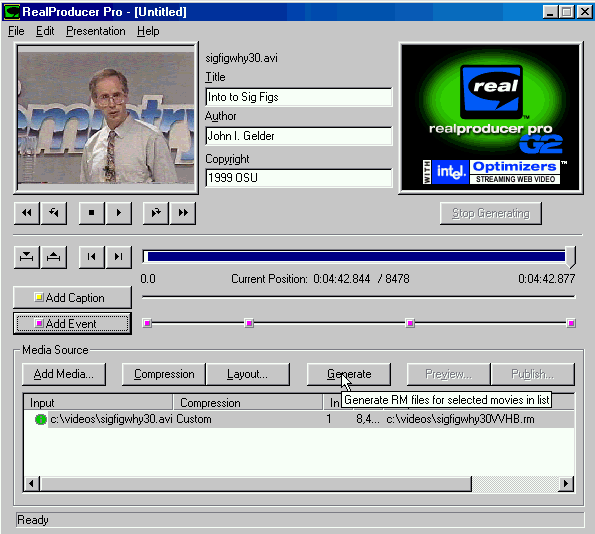
After generating all the files which are located on the
authors computer in the output directory one must Publish the
files to the RealVideo server and the HTTP server. this final set
is required so the the material is accessible on the Web.
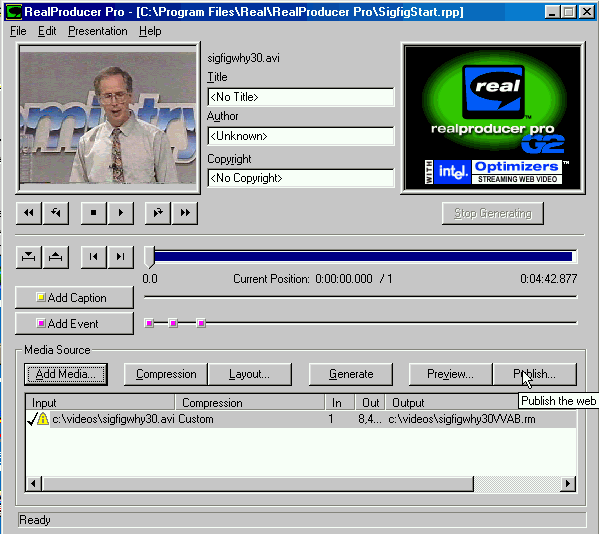
In the Publish area one must select the particular User
Profile (which includes the Real Server and HTTP server
information).
The next screen after selecting the user profile lists all
the files that are generate. Two slides are required to show
allthe files produced.
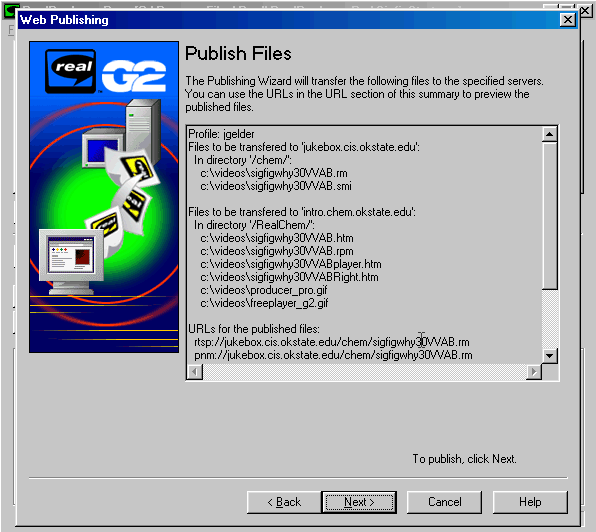
Here is the second slide showing the files produced.
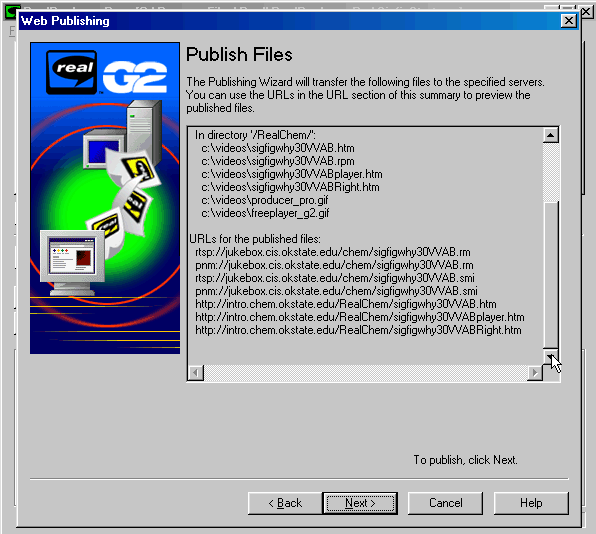
Finally, after all of this! all that is required is a link on
a web page to the output HTML file identified. In this particular
cas it is titled http://intro.chem.okstate.edu/RealChem/sigfigwhy30VVAB.htm.
That is the HTML page which will load the framed file as shown at
the beginning of the slides.
Text removed from paper (throw this away sometime)
What I would like to spend some time discussing
are some of the issue associated with producing the materials and
to show you a portion of an example. The example is the one I am
learning on and it has some problems. But it is working. Since we
do not have an Internet connection we will not be able to a
'live' demonstration, however anyone interested can access the
materials through my Web site
(intro.chem.okstate.edu/RealChem/Menu.html).
I'm going to do as good a job as I can from this
point on to describe what I've done. However, please understand
that I'm a Mac guy who has had to move into the PC world...it
hurts but I had to go there to try to do what I envisioned the
materials needed to be able to do.
First off, digitizing the video is the
relatively easy part. After I had a kid get all the video and
audio connection to work so when I inserted a tape into the VCR
and started Premier to capture video, I could see AND hear what
was being digitized. Right now I am capturing uncompressed video
at 29.97 fps 480 x 360. I would be delighted to hear from anyone
suggestions about optimum capture setting. A 4 to 5 minute .avi
file can be as large as 2 gigs! But it sure looks and sounds
great. I'm trying to little if any editing in Premier. But my
goal is use an uncompressed .avi file as the source for the video
for RealProducer Pro G2.
Between August, 1989 and May, 1992 I taught an Advanced
Placement Chemistry course to high school students across the
United States. The course was live and delivered via satellite to
participating schools. I had a grant from NSF to support a year
of development and to help defray some of the costs to the
participating schools during the first year of delivery. The
second and third year of delivery were support by fees to the
high schools and some funding from the State of Oklahoma and the
College of Arts and Sciences at Oklahoma State University. As a
result of teaching the course for three year I ended up with
copies of each of the video lectures. Over the years since
teaching the course I've tried to find ways to utilize the
videos.